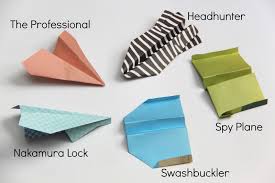
This article will tell you know how to make a fast paper airplane, Follow these instructions, and it’ll be great! Have fun making this!
- Fold the paper in half.Fold the paper in half again, and give the corner a pinch fold.
- Fold one half of one side of the pinched paper into the middle pinch fold (a quarter of the paper) and give that one-quarter spot another pinch fold.Note the small pinch fold at the one-quarter mark and the halfway mark.
- Fold from the one-quarter pinch fold inside to the other corner, making a triangular fold. Crease the edge.
- Squash-fold the triangle that was just created by lifting the triangle, putting a finger between the paper to make sure it pulls apart, and then press down, making sure the creases line up.
- Flip the page over and fold the other side of the squash-fold into itself. Crease the edge.
- Fold the wide end of the paper toward the “pocket” that was created during the squash-fold. Make a crease to set the corner in place.Leave a small amount of space between the corner and the edge of the paper, then fold the section down and crease it. When you fold, do not fold all the way to the opposite corner. Instead, leave a small amount of space, as seen in the photo. Do the same to the other side of the plane.

- Lift the flap that you’ve created and, using the squash-fold line that you created earlier as a guideline, fold the front of the flap along the squash-fold line.If you have an odd-looking mess like this, you’re on the right track. Now you should have a section narrow enough to fit into the pocket created by the squash-fold.
- Fit the section into pocket. It should fit cleanly but snugly.
- Fold the top corner of that same side down, using the creases as the angle guidelines.Now repeat the last two steps for the other side until both sides look the same and line up.
- Fold the side flap from the back crease to the front crease nearest the pocket. Do the same to the other side.
- Squash-fold the entire aircraft from the front edge. Open up the top side of the plane and fold it into itself. Make sure the front crease lines up with the crease on the bottom side of the plane.
- Flip the plane over and bend back the front of the plane, using the corners outside the front point as the guideline.
- Do a valley-fold of the plane so that the plane is now in half. Crease the edge.
- Fold just below this line parallel with the main center crease to create the fuselage piece.Do this to both sides.
- Create wiglets by folding small pieces of the loose wing upward. Do this on the other side.
- Unfold the plane. It should have a base where you grab it, and the wings should be flat with the wing lets perpendicular to the wing.
- Run your fingers along the front wings of the plane until it has a slight curve. This will help the plane return to you a little better. Now you’re done!